Wednesday, June 26, 2013

How to make a GIF using Picasion
1
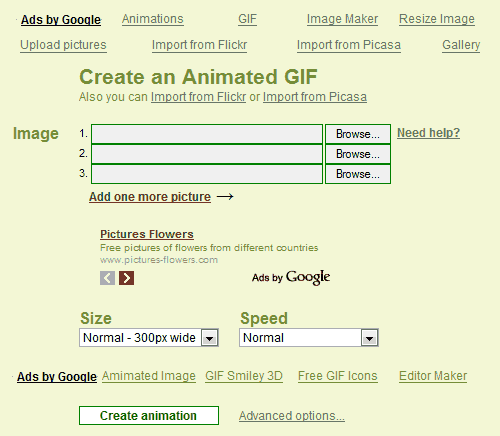 Choose the images
When you are on the home page of Picasion, the below image is what you will see. To begin, you should upload more than one image to create an animated GIF. You can choose to import the images from your own local files or from popular online photo sharing website such as Flickr or Picasa. Smaller-sized files are preferred to larger ones, as they are easier to manipulate and play around with.
NOTEYou can also alter the size and speed of the animated GIF. A higher speed GIF will switch the images more quickly. However, you do not want to make it too fast otherwise your eyes will hurt from it moving too quickly!
NOTEIf you require assistance and are unsure about how to use Picasion, there is a Help link on the right hand side of the column to guide you. Do not be scared to ask for help if you find it too daunting. The instructions found when you click on the Help icon are useful and easy to follow. Even those who are technologically inept are able to create a GIF easily with Picasion!
NOTE
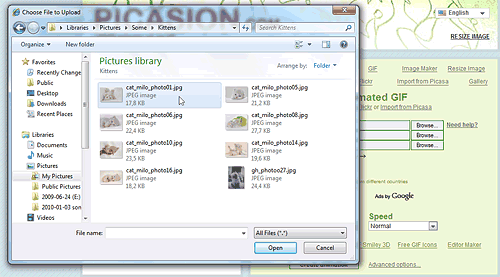 If you wish to import images from the computer that you are currently
using, you will need to click on the Browse button to choose the images
you want to use from your computer. A pop out box will appear as shown
in the image below.
NOTE If you are a Flickr or Picasa web album user, and wish to import images from there, there is a link provided at the Picasion home page. You can find this below the title, “Create an Animated GIF”.
2
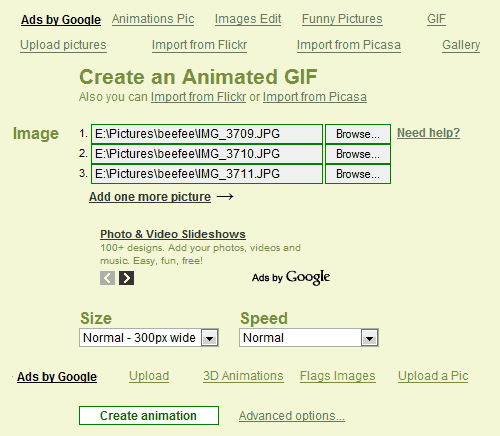 Click the button
Once you have chosen what files to upload and have determined the size and speed that you desire, click on the “Create Animation” button at the end of the column to proceed. As with email settings and many other file uploading systems, you can choose more than one file at a time. However, if you are new, you can choose 2 or 3 images so that you can get the hang of it. The reason for this will become clearer as we continue on with these steps.
3Done!
Once you have created the GIF animation, you will be directed to another page which will show the end result. It may take a while to create, depending on the images' file size. Small sized images tend to load faster, as mentioned in step 1. The reason for this is because the smaller the image size, the easier it is for your computer and the software to process the end result.
NOTEAt the bottom part of the page, there are options for you to either share it on famous online networking websites such as Facebook, MySpace, and Twitter. Also, HTML codes are provided to enable you to insert the animated GIF in your own personal website, blog, or in an online forum.
This is a basic copy and paste situation which you can use to show off what you have made so far. Of course, you can also test the end result first to see if you want to edit the pictures you are using, the speed, and so on.
How to Use Your Android Phone as a Portable Wi-Fi Hotspot

Just as you can use the iPhone as a Wi-Fi hotspot, many Android smartphones and tablets, starting with version 2.2 (Froyo) can be used as mobile hotspots
or portable Wi-Fi hotspots, letting you share your data connection on
your Android device wirelessly with up to 5 other devices, including
other cell phones, tablets, and computers. The Wi-Fi data sharing
feature is built into the Android devices.
This is more convenient than traditional tethering where you would share a data connection with a single computer using a USB cable or bluetooth, possibly with the help of software like PdaNet. Using the portable Wi-Fi hotspot feature, you don't need to have the app installed on your laptop or other devices and you get simultaneous Wi-Fi internet access for several devices. The downside, however, is that your carrier may charge a fee for the Wi-Fi hotspot feature (but most are charging extra for tethering too, so they're really the same thing).
Using your phone as a Wi-Fi hotspot is pretty simple; you just need to turn the feature on in your phone, and then the Wi-Fi signal will appear just like a regular wireless access point that your other devices can connect to. Here are the step-by-step instructions (they may vary a bit depending on your device, but the overall gist is the same).
Computerworld has posted a workaround to this Wi-Fi hotspot blocking: Use an Android widget app such as Extended Controls or Elixer 2, which toggle the Wi-Fi hotspot on or off on your homescreen so you can access the hotspot feature directly (without going through extra charges from your wireless provider). If that widget doesn't work for you, a free app called FoxFi does the same thing. Note that with other kinds of tethering, this is definitely a "do at your own risk" procedure.
That said, if you aren't restricted from using the Wi-Fi hotspot feature on your Android device, this is how to enable it and share your mobile data plan:
This is more convenient than traditional tethering where you would share a data connection with a single computer using a USB cable or bluetooth, possibly with the help of software like PdaNet. Using the portable Wi-Fi hotspot feature, you don't need to have the app installed on your laptop or other devices and you get simultaneous Wi-Fi internet access for several devices. The downside, however, is that your carrier may charge a fee for the Wi-Fi hotspot feature (but most are charging extra for tethering too, so they're really the same thing).
Using your phone as a Wi-Fi hotspot is pretty simple; you just need to turn the feature on in your phone, and then the Wi-Fi signal will appear just like a regular wireless access point that your other devices can connect to. Here are the step-by-step instructions (they may vary a bit depending on your device, but the overall gist is the same).
Updated: Workaround for Enabling Wi-Fi Hotspot for Free on Carrier-Restricted Plans
The instructions below are for the universal Wi-Fi hotspot feature found in Android, but even if you follow them you might not get internet access on your laptop or tablet after you connect. The reason is that some wireless carriers restrict the Wi-Fi Hotspot access to only those who are paying extra every month for Wi-Fi Hotspot access ($15-30 more a month on top of their mobile data plans).Computerworld has posted a workaround to this Wi-Fi hotspot blocking: Use an Android widget app such as Extended Controls or Elixer 2, which toggle the Wi-Fi hotspot on or off on your homescreen so you can access the hotspot feature directly (without going through extra charges from your wireless provider). If that widget doesn't work for you, a free app called FoxFi does the same thing. Note that with other kinds of tethering, this is definitely a "do at your own risk" procedure.
That said, if you aren't restricted from using the Wi-Fi hotspot feature on your Android device, this is how to enable it and share your mobile data plan:
Turn on the Portable Wi-Fi Hotspot on your Android smartphone (or tablet)
- Go to the Settings screen on your Android phone. You can get there by pressing the menu button on your device when you're on the home screen, then tapping "Settings".
- At the Settings screen, tap the "Wireless & networks" option.
- You should see an option for "Portable Wi-Fi hotspot". Click the
check mark beside it to turn on the hotspot and your phone will start
acting like a wireless access point. (You should see a message in the
notification bar when it's activated.)
- To adjust and check the settings for the hotspot, tap the aptly named "Portable Wi-Fi hotspot settings" option. You'll need to do this if you don't know the default password that will be created for your hotspot so you can make a note of it for connecting your other devices.
- You can change the default password, security level, router name (SSID), and also manage users connected wirelessly to your phone in the Wi-Fi hotspot settings.
Find and Connect to the New Wi-Fi Hotspot Created
- From each of the other devices you want to share Internet access with, find the Wi-Fi hotspot; this will probably be done automatically for you. (Your computer, tablet, and/or other smartphones most likely will notify you that there are new wireless networks to connect to. If not, on another Android phone, you'll find the wireless networks under Settings > Wireless & networks > Wi-Fi settings. See general Wi-Fi connection instructions for most computers.
- Finally, establish the connection by entering in the password you noted above.
Tips and Considerations
- Make sure you turn off the Wi-Fi hotspot feature when you no longer need shared Internet access from the other devices, since this can drain your cell phone's battery significantly.
- By default, the portable Wi-Fi hotspot will most likely be set up with WPA2 security and a generic password. If you're using this feature in a public place or concerned about hackers trying to intercept your data, it's best to change the password to something else before broadcasting your signal.
- Keep in mind again that your cell phone company might charge extra for this feature and/or have data restrictions on its usage, so make sure you check your plan or with your carrier for more information.
How to make your Android phone look like an iPhone 5
If
you're curious what your Android phone would look like disguised as an
iPhone 5, there's a launcher program that will do just that.
 (Credit:
Screenshot by Ed Rhee/CNET)
Created by a user at XDA Developers, Fake iPhone 5 is a replacement launcher that makes your Android phone's screen look almost exactly like an iPhone 5's. The main home screen's icons look like duplicates of iOS 6's. By default, the launcher starts with four rows of icons, but you can switch to five.
As great as the launcher looks, it does have some limitations that might prevent you from running it all the time. For example, you can't rearrange the icons on the screens and you lose widget support.
Also, while most of the iOS 6 app icons correlate to their Android counterparts, some, like Passbook, do not. Tapping on the Passbook icon will launch an ad, which is a reminder that Fake iPhone 5 is an ad-supported app.
Tip: To switch back to your previous launcher, tap the Menu key on your Android phone, then Advanced > Switch Launcher.
That's it. Will you use Fake iPhone 5 as your primary launcher? If not, let us know what alternative launchers you prefer for your Android phone.
Subscribe to:
Posts (Atom)